Showing posts with label Longarm Quilting. Show all posts

Friday, June 20, 2014

Quilts of Valor + "New" Pantos

I promised myself I would get a blog post up this week!!!  I'm so frustrated with myself for not being more on top of blogging!  BUT the good news is as long as I can work in the time to actually write the post I have lots of good stuff to share as I've been saving it all up :)

Last summer I began volunteering my longarm quilting services to Quilts of Valor.  I have been doing approximately two quilts each month.  It's been a lot of fun and has given me a chance to try out a lot of different quilting styles.  Many of the quilts I freehanded with my machine, but the two I'm going to share today show two pantographs I bought specifically to use on Quilts of Valor.

Megan+Ziegler+Longarm+Maching+Quilting+Gettysburg+Pennsylvania

Megan+Ziegler+Longarm+Maching+Quilting+Gettysburg+Pennsylvania

Megan+Ziegler+Longarm+Maching+Quilting+Gettysburg+Pennsylvania

Megan+Ziegler+Longarm+Maching+Quilting+Gettysburg+Pennsylvania

Megan+Ziegler+Longarm+Maching+Quilting+Gettysburg+Pennsylvania

Megan+Ziegler+Longarm+Maching+Quilting+Gettysburg+Pennsylvania

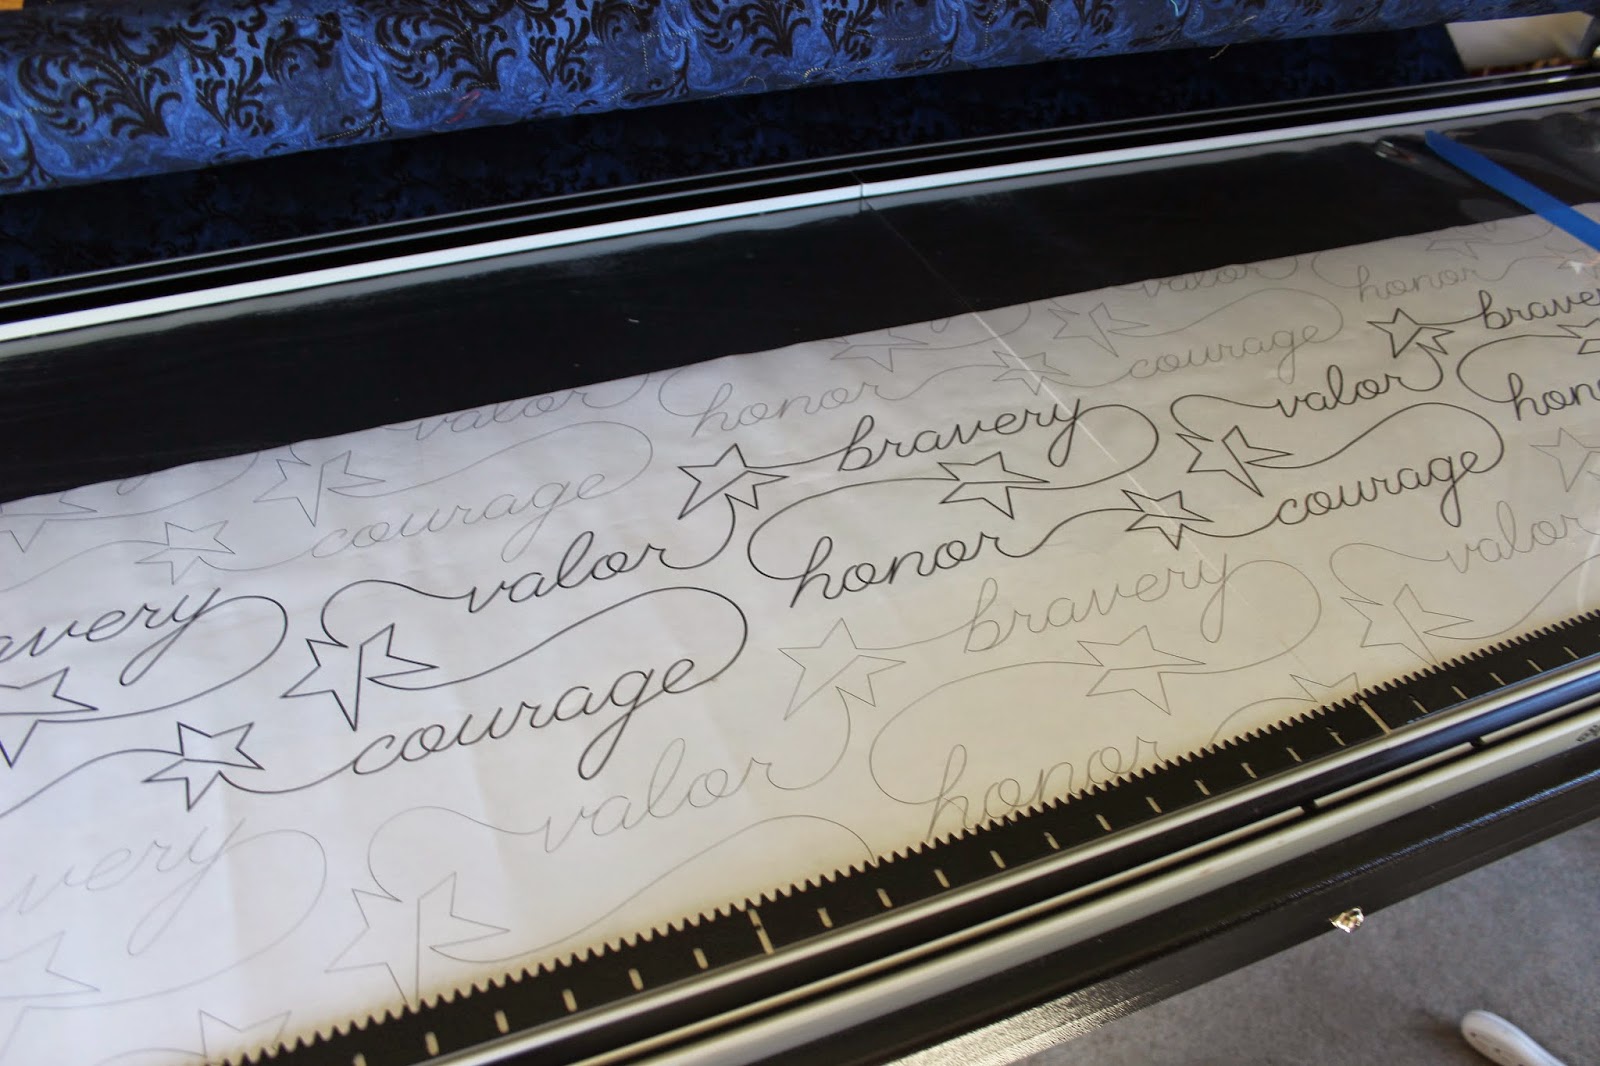
The above photo shows the pant laid out on my longarm quilting machine.  It is from Urban Elementz and can be found here ("From the Heart").  The thread I used was by Superior Threads and is from the Magnifico line (one of my favorites!).

Here's a look at the other quilt I did for this same group, but with a different pantograph.  This pantograph is also from Urban Elementz and can be found here ("Star Spangled Support").

Megan+Ziegler+Longarm+Maching+Quilting+Gettysburg+Pennsylvania

Megan+Ziegler+Longarm+Maching+Quilting+Gettysburg+Pennsylvania

Megan+Ziegler+Longarm+Maching+Quilting+Gettysburg+Pennsylvania

I hope you enjoyed these AND I hope I'm back here next week! :)

Have a great weekend,
Megan

Wednesday, April 9, 2014

Knock, Knock ...

Me: "Knock, knock ..."
You:  "Who's there?"
Me:  "Ivaben"
You:  "Ivaben, who?"
Me:  "Ivaben Gone for a while."

Ok, so now you know the truth about me ... I am a total dork ;)  I was pretty pleased with myself when I came up with that joke, lol!

You may have noticed we haven't been around for quite a while, and boy have we missed blogging.  BUT other than a whole lot of pictures of boxes and us moving things around, there hasn't been a whole lot to share.

Now though we're getting back up and running and we are SO excited to get back into somewhat of a routine which for us includes blogging.

As I continue to get things more organized there are projects we've finished and are looking forward to sharing.  Now that we're more settled we're working to establish the longarm quilting side of our business and are looking forward to doing more of that.

Some exciting news includes that this summer we'll be hosting our first Quilt-A-Long based on a pattern from the fabulous Judi Madsen's (aka the Green Fairy) new book, Quilting Wide Open Spaces. The Quilt-A-Long will be a longarm quilter's QAL, won't that be fun?!?  The pattern I've chosen is definitely going to stretch our skills and hopefully yours as well!  Be sure to check back for more details!  AND I have to THANK Judi for giving me her blessing for moving forward with this project - Thank you for your support!  If you haven't purchased Judi's book, you can buy one from her site signed - HERE!  It is an AMAZING book for us longarm quilters and freemotion quilters, I've already used some of her suggestions to improve my quilting! PS You will be required to buy the book if you take part in the QAL.

I've been blessed to continue working at A Touch of Thread in Ohio one weekend a month.  There, I teach longarm quilting to beginners - those wishing to rent time on the machines and I lead the Saturday longarm quilt guild.  If you're in the area - Zanesville, Ohio - we'd love for you to come and see what our group is all about.  If you'd like more information, please email me at megan@cherryvalleydesigns.com

Enough talking, here are some pictures ...

Megan Ziegler Gettysburg Pennsylvania Longarm Machine Quilting

This is my Work In Progress ... I was going to use metallic thread for the first time on a customer quilt and obviously didn't want her quilt to be my practice piece.  So, I was going to just practice on the muslin, but then got this idea to make something and so one thing turned into another and now I have three spools of Superior's kimono silk thread to use as filler in the background and these fun paints and paintstiks to finish my "practice piece."


One of the great things about our new house is that we now have a dedicated studio space (more on that to come)!  A few weeks ago we got our sofa and chair where we can relax in between projects but more often then not you'll find my boy Max enjoying the sofa ... specifically keeping watch of everything happening on our street ...

"Ho hum, nothing too exciting ..."

"Ooh, what's that?!  What's going on out there?!?"

"Seriously mom, are you done with all the pictures?  You're interrupting my people watching time!"

I'm off to spend the afternoon at Gentle Giants Horse Rescue where I'm doing my orientation to volunteer with the horses. I cannot wait, I'll be sure to share pics of my time there!

Until next time!

Megan

A special shout out to our two linky parties today, be sure to check these sites out for more fabulous blogs!  Work In Progress Wednesday and 

Thursday, September 26, 2013

TGIFF - You're in the Right Spot!

Hello Everybody!  It's nice to have you here from TGIFF, I am the host this week and glad you stopped by!


Today I'm sharing a quilt I finished up this week that I will be teaching at A Touch of Thread in Zanesville, Ohio during October.  The quilt is now hanging there and is the pattern, "Afternoon Delight" by Elisa's Backporch Design.  I was surprised at how quickly the quilt came together - I got it pieced in one day! - and love the fall colors to it.


I quilted it on my Gammill and used a new panto I got from Willow Leaf Studio called Autumn Oaks.


The top thread Superior Threads So Fine #728 - it's variegated - and I used Superior Threads Omni #3035 in on the bottom.


The backing is hand dyed batik flannel from Sew Batik and I am absolutely in love with it!  I washed it prior to quilting with Synthrapol and it is soooooo soft!

Thanks for stopping by and be sure to add your link. Also, don't forget the rules:

1) Say "hi",
2) Comment on other's links, and
3) Add away!

Have a wonderful weekend and Thank Goodness It's Finished Friday!

Megan

Friday, September 13, 2013

Snowflakes and Such

I finished up this quilt last week and dropped it off to the owner yesterday.  This was the first quilt she has EVER made, can you believe it?!  This is a variation on my Jolly Holly quilt and she made it last year when I taught the class at A Touch of Thread.

I took over my sampler quilt (I'll share more about this next week) and she picked out the designs she wanted.  She decided she wanted snowflakes in the outer border, vines in the inner border, overall meandering in the body of the quilt, and stitch-in-the-ditch around the snowflakes with tight meandering in the white background.

Megan Ziegler Cherry Valley Designs Longarm Quilting

Megan Ziegler Cherry Valley Designs Longarm Quilting

Megan Ziegler Cherry Valley Designs Longarm Quilting

Megan Ziegler Cherry Valley Designs Longarm Quilting

A few weeks ago I started working at A Touch of Thread one day a week to help out and have had the opportunity to "test drive" the Ellisimo by Baby Lock.  Wow!  All I can say is now I know how people feel who drive cadillacs ... LOL :)  Anyways, I decided to make a matching pillowcase to go with this quilt and try out machine embroidery - something I've never tried.  It was a lot of fun and a nice surprise for Rose.

Megan Ziegler Cherry Valley Designs Longarm Quilting

Thanks Rose for letting me quilt your quilt!

Have a wonderful weekend!
Megan 

We're linking up today with: Finish It Up Friday; Can I Get a Whoop Whoop?; Thank Goodness it's Finished Friday.

Monday, July 29, 2013

Quilts of Valor, Quilt 2

Hi Everyone, I hope your week is off to a great start!  A little housekeeping first, you'll notice on the left hand side instead of Google Reader we now have two new ways for you to follow our blog - since Google Reader is no longer operating :( The first is Google+ and the other is BlogLovin'  Be sure to add yourself so you don't miss anything!  I have "Learn Google+ on my 'To Do' list this week" BUT I do already add new blog posts to my timeline!  So, I figure I'm one step in the right direction, or at least that's what I tell myself ;)  How many of you have tried Google+? What are your thoughts?  It seems like there isn't a day that goes by that there isn't something new in the world of social media!

Moving on I thought I'd share another quilt I worked on for Quilts of Valor.  This quilt was done for the same guild and again was made using scrap materials from donated stashes ... what a great way to use those fabrics when we're "cleaning shop."  For this quilt, I just did an overall swirl design with outlined stars interspersed.  I probably would do tighter swirls on other projects and use them more as a filler, but I wanted this quilt to be comfy and not stiff from having used a tight design.  The sizing and spacing worked out perfectly and gave me a chance to practice my swirls!

Cherry Valley Designs Quilts of Valor

Cherry Valley Designs Quilts of Valor

Cherry Valley Designs Quilts of Valor


Until next time!

Megan

Friday, July 26, 2013

Christmas in July!


Happy Friday Everybody!  Fall is quickly approaching and what does that mean?  New patterns and products!  Help us clean out some space to get ready.

Now through Tuesday (July 30) receive 50% off your ENTIRE purchase when you enter the code JULY2013 at checkout! Click here to begin shopping!

Onto Finished Friday ... At the beginning of July I signed up as a Quilts of Valor volunteer longarm quilter.  I was quickly connected with someone living in the same town as me.  Funny thing is that she also used to work with my parents, what a small world!  She said the closest person she had ever quilt for her was about an hour and a half away.  Well, no more!  She gave me two quilts that her quilt guild worked on putting together.

They are scrappy quilts and were a lot of fun to work on and practice some new designs, mainly the echoed feather border.  I have been terrified of echoing, but it ended up not being so bad.  You'll also notice that I put little stars scattered throughout the feathers just for fun.

Less talk, more pictures ...

Cherry Valley Designs Quilts of Valor

Cherry Valley Designs Quilts of Valor

Cherry Valley Designs Quilts of Valor

I finished up the second quilt last night, but haven't had a chance to photograph it.  That will be a post for next week.  Thanks Judy for letting me quilt your quilts!

Special shout out of thanks to the linky parties today: Finish It Up Friday; Can I Get a Whoop Whoop?; Thank Goodness it's Finished Friday.

Have a wonderful weekend!

Friday, July 19, 2013

Finish It Up Friday + Binding Tutorial

Happy Friday Everybody!  Today I wanted to show you the finished quilt from last week's "Life's A Charm" series.  You can click here to read more.

Cherry Valley Designs Binding Tutorial

I did an easy all over block design on this quilt which was a lot of fun, it was a new design for me and it doesn't take away from the busyness of the quilt.  However, for the binding I wanted to try a new technique I learned a couple of weeks ago and thought I'd pass the tutorial on to all of you.  I learned about this a few weeks ago at a machine quilting guild I belong to.  With this technique, you put the entire binding on by machine.  While I'm sure many of you know about this, for those of you who don't I hope this helps a bit.

First, make your binding the way you normally would.  Mine is 2 1/2" wide and I fold it in half and then press.  A little trick is to use an old coffee can and put it in while you're ironing, that way it doesn't fall all over the floor and you can just pull it out easily as you're stitching it down.  This has been a lifesaver for me.

Cherry Valley Designs Binding Tutorial

Once your binding is prepared, attach your binding like you normally would with the raw edge of the binding matched to the raw edge of the quilt, but make sure you sew it to the back of the quilt.

Cherry Valley Designs Binding Tutorial

Then ... you need to cut off the excess at the beginning and end of your binding on the diagonal and do the final sew down.

Cherry Valley Designs Binding Tutorial

A tip of mine is to take a picture of positioning the ends correctly, taking a picture, printing it and keeping it at my sewing machine.  This way, when it's time to do this, you have an easy reference.  I was always getting mixed up and ended up twisting all my ends every which way.  Now I have a nice visual to clue me in ... no more frustrations!

Cherry Valley Designs Binding Tutorial

Finally, pull the front of your binding around to the front (make sure your top thread matches your binding!) and stitch down with the blind stitch.

Cherry Valley Designs Binding Tutorial

This was the first time I've tried it myself and it went pretty smoothly with the exception that my machine doesn't allow a stitch to have a mirror image.  So when I used the blind hem stitch I had to push the whole body of my quilt into the machine so the stitch was facing the right way.

Special shout out of thanks to the linky parties today: Finish It Up Friday; Can I Get a Whoop Whoop?; Thank Goodness it's Finished Friday.

Have a Wonderful Weekend!

Megan

Friday, April 26, 2013

Shake Your Pom Poms Blog Hop

Welcome to everyone visiting the blog today!  If this is your first time visitingwI hope you kick your feet up and enjoy your stay!  If this isn't your first time, I'm glad you're back!  There are some free tutorials on the right hand side of the blog and some other links across the top.  Be sure to stop by our website before you leave ... there are other interesting things there including a place to sign up for our monthly newsletter (Hint: You receive a free pattern when you sign up the first time!!).  To learn more about me and my company click here, my patterns are here and you can find out more about my longarm services here!  Again, thanks for stopping by!  We're glad you're here!

Sometimes you need to do something just so you can jump out of the box you're in, and that's why a month or so ago when I saw this blog hop, I just had to join!  It got me to thinking outside the box ... what in the world could I make using pom poms?!?  Hmmmm????  I love flowers ... what flowers have large heads on them? ... what would be something as cute to make as pom poms themselves?!? DAISIES!  This project was so fun to make and the brighter colors are perfect just in time for summer!

Before my reveal though I just have to thank Madame Samm for organizing these blog hops (year round, I might add!) to give all of us bloggers a chance to "strut our stuff" and the amazing Thearica of Pig Tales and Quilts who cheered us on as we get ready for this blog hop ... you did a GREAT job!  Also, a very special shout out of thanks to the sponsors who helped make this blog hop possible!

Without further ado, the project ...

Shake Your Pom Poms Blog Hop

You may remember my post from yesterday where I was debating the background and my sketches ... well, this is how it turned out!

Shake Your Pom Poms Blog Hop

Some close ups of the fillers behind the appliqued phrase ...

Shake Your Pom Poms Blog Hop

Shake Your Pom Poms Blog Hop

And finally the big picture again ...

Shake Your Pom Poms Blog Hop

Be sure to stop by the other blogs today:


Thanks again for stopping by and have a wonderful weekend!

Megan

Thursday, April 18, 2013

Longarm Quilting Books Review

The past few weeks have been a whirlwind of getting caught up and getting to know this machine very well ...

Megan Ziegler Longarm Quilting

I still pinch myself that I get to longarm quilt every day, anytime I want to!  As many of you know I have been long arm quilting for nearly a year at a local dealer by renting time and have been fortunate to have quilted all of my patterns as we finished piecing them.   Having experience prior to getting my long arm I thought there would be no difference having it in my actual house ... noooo! It took me a couple of days to actually work up the nerve to use it.  It's so different having used it in a store where there are other people to maintain the machine and all you have to do is go in, load your quilt and leave ... voila!  How great!  But when it's your own responsibility, there's more to it ... oiling every day, figuring out tension issues on your own, etc.

For these reasons and more, I was so fortunate to have picked up two amazing books along with a stack of Machine Quilting Unlimited.  The first few days I read the books and the Gammill manual.  While the manual for your machine may not be the most tantalizing read, it is an absolute must to read before you work on your machine.  The reason for this is even if you aren't a technical person, you'll become more familiar with the jargon, and most importantly you'll know what's actually covered in the manual so if you do run into a problem, you'll know whether or not to turn the quilting machine on.


The first book is The Ultimate Guide to Lonagrm Machine Quilting by Linda V. Taylor and the second is the ABCs of Longarm Quilting, 2nd Edition by Patricia C. Barry.  I can't recommend these two books enough.  They are written in different styles and while there is some overlap in material, each author gives their own unique perspective and ideas.  Each book starts with an overview of longarm quilting machines - their parts; maintenance; loading a quilt; etc.

One of the greatest takeaways from Taylor's book includes her chapter on Freehand Techniques where she gives a sample quilt to design for showcasing your own longarm quilting skills to potential clients.  Another chapter unique to Taylor's book is her chapter on longarm body care.  Having ridden horses growing up I find longarm quilting similar in that just as a horse can feel when you're tense, so, too, can your longarm machine.  It is important to not only stretch before beginning but take stretching breaks throughout your time at the machine.

I thoroughly enjoyed reading Barry's book and loved how she separated definitions in the introductory part of the book into "artistic" definitions and "technical" definitions.  What I mean by this is as she's going through different components of the machine she gives a definition that a more artistically inclined person would understand followed by one a more technically inclined person (loosely, big picture versus detail oriented).  As she states we all tend to be a mix of these two "types" of people and I found myself sometimes understanding one definition over another and vice versa at other times.  The other part I loved about Barry's book is her business section.  She gave me things to think about that I had never considered and also has some clever ideas included for promoting your business.

All in all, I feel very fortunate to have stumbled upon these two books.  They were the only two general  longarm quilting books at my dealer and it just so happened that they both happened to be great!  From here, I don't think I'll be buying any more general books, but instead looking more towards specialized books.  If you are thinking about buying machine, are new to having a machine I would definitely recommend these books and if you've had a machine for awhile but never looked at generalized books I would recommend going back and looking over these.  You never know you may learn something you didn't know!!  I know I sure did!

I hope you found some of this information useful!  I am looking forward to sharing information with you along the way as we (my mom is giving her hand at longarm quilting, too!) venture further into longarm quilting!

Megan
Related Posts Plugin for WordPress, Blogger...
Pin It button on image hover