For this month's Life's a Charm we decided to make a quilt (imagine that! ... our first for "Life's a Charm"), something easy that could come together in a snap. We've had 16 fat quarters of 30's reproduction fabric sitting around in our stash for a long time and decided it was high time to do something with it. So, I cut it up into 5" charm squares and got 192 squares. We ended up using most of these squares for this lap quilt.
For those of you making charm squares out of a fat quarter, it is very easy to do. You will be able to get 3 rows vertically and 4 rows horizontally giving you 12 charm squares.
Here's how it goes ...
"X" Marks the Spot
Finished Size: 50" x 50"
- 4 color scraps of material for 162 - 5" squares (this would be equivalent to 5 charm packs);
- 56" x 56" piece of batting;
- 56" x 56" piece of backing fabric;
- 220" of binding;
- A 6 1/2" x 24 1/2" ruler (for cutting your 5" squares out) - I prefer Creative Grids;
- A 2 1/2" x 12 1/2" ruler - again, Creative Grids; and
- A 6 1/2" square ruler - of course, Creative Grids;
- Your favorite rotary cutter, cutting mat, sewing machine, iron and ironing board!
Step 1:
Separate your color scraps and make two groups of two. So, I put purple and blue together (group 1) and pink and green together (group 2).
Step 2:
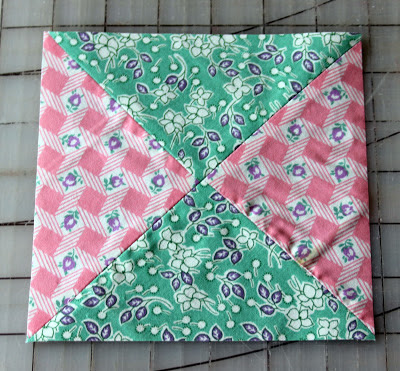
Chain piece your squares together, right sides facing, and sew a quarter inch seam allowance down one side of all your pieces. Next, sew a quarter inch seam allowance on the opposite side. Yes, that's right, just trust me on this one ;)
Step 3:
Using your 2 1/2" x 6 1/2" ruler, cut each square on the diagonal and iron the seam flat.
Step 4:
Pin your pieces back together, lining up your center point to create an hourglass block and sew together. Your will need 49 blocks of your first group and 32 blocks of your second group.
Step 5:
Using your 6 1/2" square ruler, proof your blocks to 6" x 6" squares.
Step 6:
Iron your seams flat. Lay your quilt out starting with one color in the center and lay the alternate color around the center block. Keep alternating colors (around the world) until you have a 9 block x 9 block quilt. Sew your rows together. Your quilt top is complete!
I can't wait to get it on the longarm and get it quilted! Check back next week for how we quilted this and bound this quilt! ... There may even be a tutorial involved!
Until next time!
Megan


No comments:
Post a Comment