
For this month, we are making a quick table topper inspired by this month's weather ... SNOW! I was so excited when the weekend before Christmas we got our first snow and it hasn't left! I think this is a record for Ohio. For the charm pack I picked out the soft colors of Bunny Hill's Windsor Lane by Moda.

Definitely feel free to leave us a comment if you have any questions! We'd love to help and will get back as soon as possible.
Without further ado, we present ...
Life's a Charm: Snowflake Wonder


- (1) Mini Charm Pack of Your Choice
- (4) 8.5" by 8.5" pieces of Blue Fabric
- Scraps of White and Tan fabric or wool (we chose to use wool)
- You will also need fusible material or appliqué glue and a complementary thread
- 24" by 24" piece of batting
- 24" by 24" piece of fabric for backing
- 1/4 yard of fabric for binding
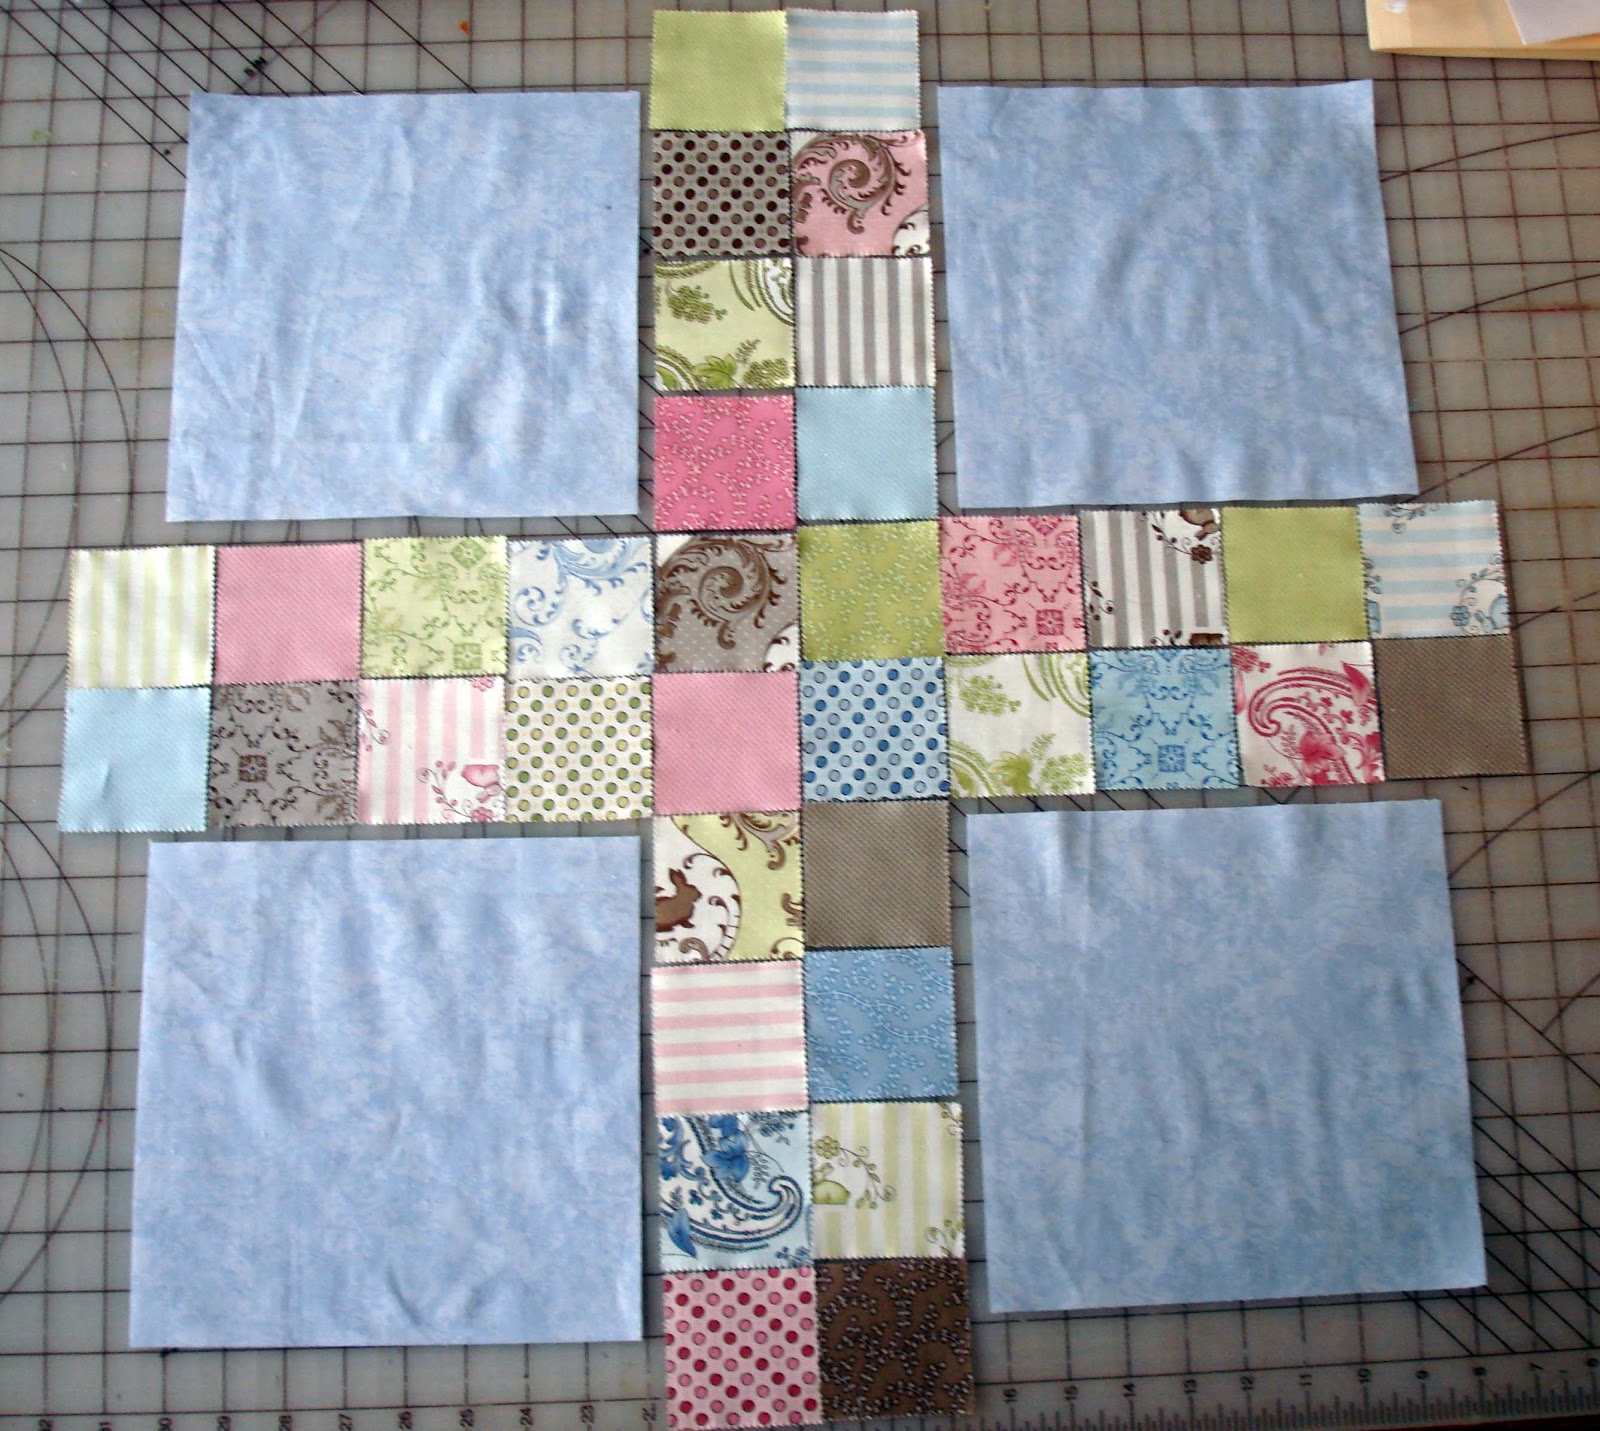
Step 1: Lay out your mini charm pack fabric on a table in a "+" sign with your 8.5" squares in the corners. The center should consist of 4 charm pack pieces, and each side coming out should be 2 by 4. See diagram and picture below.
Step 2: Begin sewing your pieces together in pairs using chain piecing.
**Tip 1** Chain piecing! Chain piecing! Where do I begin? I ♥ chain piecing! Can you tell? Well, chain piecing is one of the very first techniques I learned when I began quilting. I was taking a class that involved repeating the same sewing of a lot of blocks. As I meticulously lined up my pieces, sewed, cut and began the process again and again ... the teacher said, "Megan, why aren't you chain piecing?" Chain piecing means you simply "chain" together pieces you are sewing. This works best when you are working with the same pieces that you have to several of. See pictures below.

**Tip 2** Another chain piecing tip I just recently learned is in order to keep track of your first pieces, put a pin in the first one. This way when you have that continuous chain, you'll know which direction you should be going.
Step 3: Once this is done, begin working on your corner appliqué blocks. You can find the pattern for the appliqué pieces here. If you use wool, you will want to use freezer paper to trace your shapes on and then iron the shiny side down. Cut out shapes and center on block with appliqué glue. If you use fabric, you can follow my appliqué tutorial here. Finish by stitching around the edges - you can use your machine or stitch by hand.
Step 4: You will now want to sew all of your pieces together so your top is complete. See picture below.


**Tip 3** If you quilt your table topper at home (not long arm), then we'd suggest using Machingers (they're in our Amazon store). They help you move the fabric around so much easier! AND don't forget to use safety pins to secure your three layers together!

Enjoy!
Step 2: Begin sewing your pieces together in pairs using chain piecing.
**Tip 1** Chain piecing! Chain piecing! Where do I begin? I ♥ chain piecing! Can you tell? Well, chain piecing is one of the very first techniques I learned when I began quilting. I was taking a class that involved repeating the same sewing of a lot of blocks. As I meticulously lined up my pieces, sewed, cut and began the process again and again ... the teacher said, "Megan, why aren't you chain piecing?" Chain piecing means you simply "chain" together pieces you are sewing. This works best when you are working with the same pieces that you have to several of. See pictures below.
**Tip 2** Another chain piecing tip I just recently learned is in order to keep track of your first pieces, put a pin in the first one. This way when you have that continuous chain, you'll know which direction you should be going.
Step 3: Once this is done, begin working on your corner appliqué blocks. You can find the pattern for the appliqué pieces here. If you use wool, you will want to use freezer paper to trace your shapes on and then iron the shiny side down. Cut out shapes and center on block with appliqué glue. If you use fabric, you can follow my appliqué tutorial here. Finish by stitching around the edges - you can use your machine or stitch by hand.
Step 4: You will now want to sew all of your pieces together so your top is complete. See picture below.
Step 5: Cut 3 strips at 2.5" wide and sew together in one continuous line. You will use these for your binding. Your quilt is ready to be quilted and bound.
**Tip 3** If you quilt your table topper at home (not long arm), then we'd suggest using Machingers (they're in our Amazon store). They help you move the fabric around so much easier! AND don't forget to use safety pins to secure your three layers together!
No comments:
Post a Comment